Getting Started
1 Starting a Session
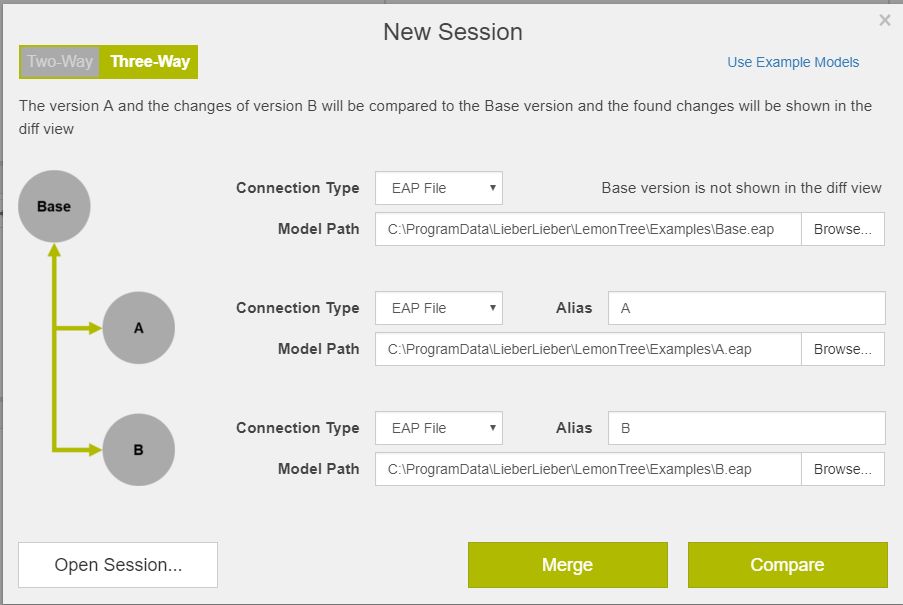
When starting up LemonTree, you'll be presented with a dialog where you can start a new session:
If you can't see the session dialog, use the Hamburger Menu  in the top left and select New Session...
First, you'll have to decide between a two-way and three-way comparison.
In two-way comparison mode, you compare exactly two models. Changes from one model to the other are highlighted and you can also merge these two models.
However, two-way comparison is limited in the types of changes which are able to be detected, because it examines only the current state of the models without any background on their heritage.
For example, suppose you and your colleague are working on a model separately. Your colleague adds a package "MyPackage" to the model and you add a class "MyClass" in some other, unrelated part. Furthermore you do some other modifications to another unrelated part. With a two-way comparison, LemonTree can only tell that the models are different regarding "MyPackage" and "MyClass", but it cannot really tell what the changes were. For all it knows, "MyClass" could've been part of the model before and your colleague could have deleted it.
A merge based on a two-way comparison therefore is something which should be thoroughly considered and reviewed. While the resulting merged model will be a superset of the input models, that may not be the intended outcome at all.
Put simply, it's the best to use two-way comparison only to compare two versions of a model, where one version inherits from the other.
In three-way comparison mode, you compare two models with each other, taking the common base version into account. Three-way comparison is a powerful method to detect which changes have been made to a common model.
Consider the scenario described in two-way comparison. Because LemonTree can take the base version into account, it can reliably detect that "MyPackage" is indeed a new package, because it did not exist in the base. The same applies to "MyClass". Therefore it is correct in this case to merge the models, producing a model with both of these elements.
Now consider the same scenario but with a twist: "MyClass" was part of the base all the time, but your colleague deleted it in his version. The outcome of the two-way comparison would still be the same, because the two models in question still contain the same data. A two-way merge would result in a merged file with the "MyClass" element. However, the intention of your colleague was to delete that class.
With a three-way merge, LemonTree is able to detect the changes correctly, resulting in a correct merged model.
As a general suggestion, use three-way comparison whenever you are dealing with two models sharing a common ancestor.
Then select the files as appropriate and click either on Merge to start a Merge Session or on Compare to start a Diff Session.
Alternatively, you can click on Open Session to load a previously stored LemonTree Session.
2 Examining the Differences
When the diff has finished, you'll be presented with the main UI. It consists of four parts.
2.1 Impacted Elements / Diagrams
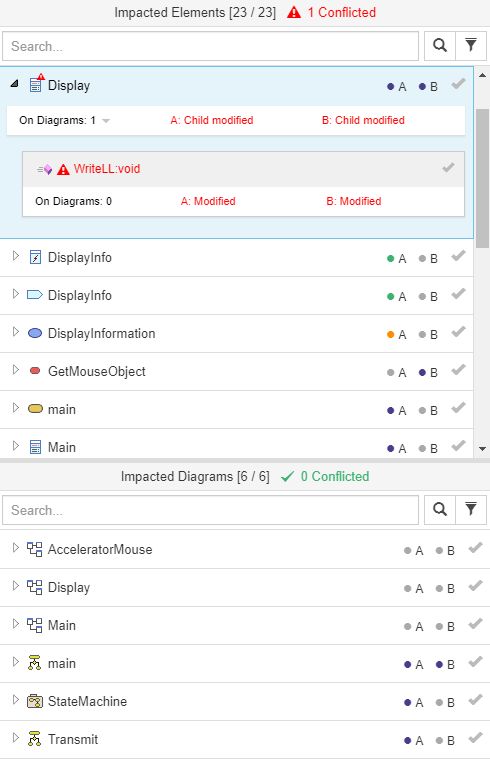
On the left, the Impacted Elements and Impacted Diagrams are shown. Impacted means that LemonTree detected a change at the element / diagram. You can search and filter these lists by using the Filter field. You can also mark elements which you've already examined as being Reviewed. Selecting an element will show it in the model browsers to the right, if a corresponding for diagrams it will open them in the diagram view on the bottom right.
Hovering on the A / B badge will tell you what changes have been detected for this element. The badges are color-coded, so you can quickly examine the elements when getting used to it.
Hovering on the On Diagrams: x will tell you the diagrams where the impacted element is visible. With clicking the link the diagram gets displayed and the element gets selected on the diagram.
Hovering A/B: status (like "A: Modified" in this example) will tell you what exactly lead to this status.
The impacted elements are grouped for better overview. Visit Smart Grouping of Changes to get more into detail.
2.2 Tree Browsers
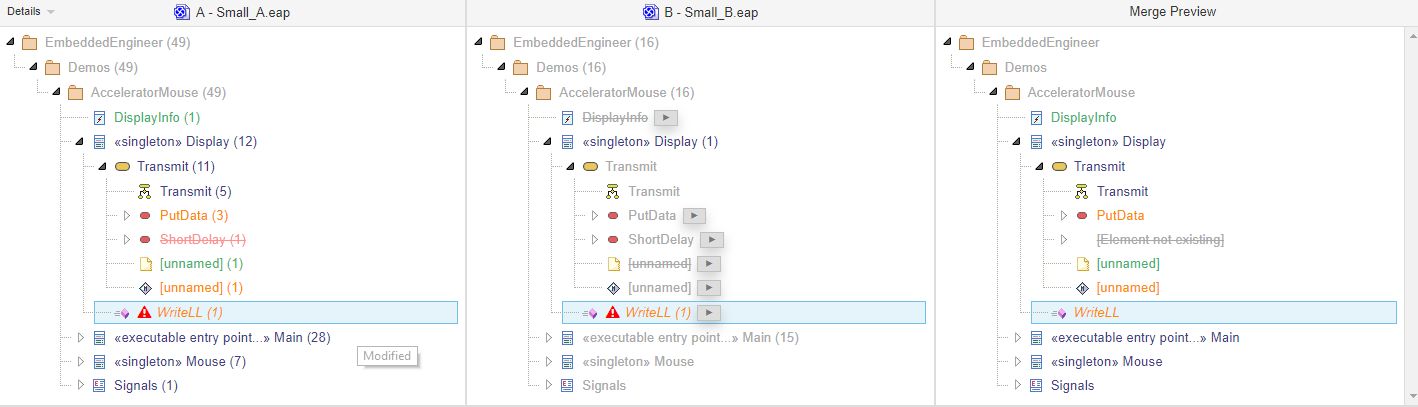
The model browsers are used to display the models and their changes, as well as a preview for the merged model. For various reasons, only an excerpt of the model is shown: Impacted elements as well as all the elements are needed to correctly display them in the original tree structure of the models.
The elements are color-coded and when hovering on an element, you can examine its state.
If an element or a diagram was changed, it will be marked with a Change Type. A explanation for all Change Types is described here: Change Types
2.3 Diagram Viewer
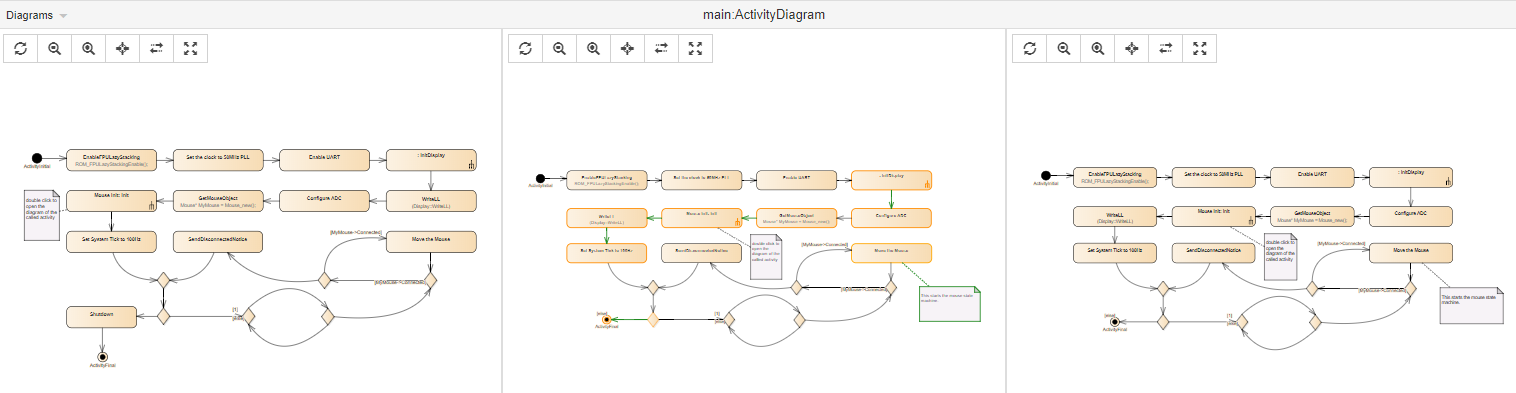
The Diagram Viewer is used to display the diagrams of both models. Elements are highlighted as well and the diagram is interactive - selecting an element in the diagram makes the model browser select that element, such that you can quickly pinpoint changes in the model.
Use the diagram by using the Pan and Zoom gestures (Mouse-Button + Drag for Pan, Mousewheel for Zoom).
There is the possibility to make the comparison of diagrams easier:
-
Diagrams → *Synchronize
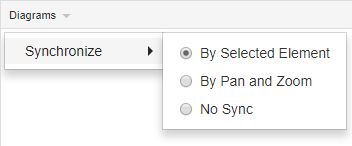 *
*
→ By Selected Element: Synchronize the selected element and zoom level of both diagrams. Irrespective of the elements location (it might have changed between diagram versions), Sync Element will center the selected element in both diagrams.
→ By Pan and Zoom: Synchronize the pan (location) and zoom level of both diagrams
→ No Sync: No synchronization
2.4 Property Viewer

The Property Viewer shows the properties of a selected elements. You can review changes on property level of elements. You have the possibility to take single properties from "A" or "B" and edit some properties.
There is the possibility to show
- all properties
- only the changed properties
Find more details on the page Property Viewer.
3 Manually Override the Automatic Merge Suggestion
When in merge-mode, you are presented with a merge preview. As noted earlier, this outlines the resulting model. LemonTree will pre-select the elements according to its merge rules described in Diff & Merge Strategy. It will try its best to preserve intent - that is, to identify what the changes to both models were and to preserve these changes in the resulting model. Nonetheless there are situations where you want to override these decisions, preferring one version of an element over the other.
You can do this by using the small buttons with angle brackets  in the Tree Browser. Using such a button instructs LemonTree to prefer that version over the other. It will also respect the dependencies and additional linked elements so that the selected element will be complete in the merged model. After performing this action, elements where the user decision differs from the pre-selected decision will be marked with a little hand icon
  right next to them.
To take over the entire subtree below an element use the "Take Subtree A"/"Take subtree B" buttons in the top row.
Since LemonTree 2.2.0 you also have the possibility to make your decisions in the Diagram Viewer. When selecting an element LemonTree now offers buttons to take that version into the merge preview.
4 Merging
As a last step, you can click on the Start Merge button in the toolbar, instructing LemonTree to export the model to an EAP file. If LemonTree has been started by VCS Integration, clicking this button will immediately start to export the model to a predefined location. In manual mode, you can now select the output folder and file name for the merged model.
LemonTree uses the A (Theirs) Model as a template for writing the merged model. Unsupported tables (primarily maintenance tables and configurations) will thusly be preserved from one version. Changes to unsupported tables in the other version will be discarded.
Writing big models to an EAP file might take a long time. Please make sure not to interrupt the process, which will render the resulting model invalid.
5 Setting up a Git Repository
As a last step, you can click on the Start Merge button in the toolbar, instructing LemonTree to export the model to an EAP file. If LemonTree has been started by VCS Integration, clicking this button will immediately start to export the model to a predefined location. In manual mode, you can now select the output folder and file name for the merged model.
LemonTree uses the A (Theirs) Model as a template for writing the merged model. Unsupported tables (primarily maintenance tables and configurations) will thusly be preserved from one version. Changes to unsupported tables in the other version will be discarded.
6 Model size (optional)
Putting the "original" EA Model file under version control can result in large amounts of data. We recommend checking the model for unnecessary data before versioning. LieberLieber Software provides tools to clean up your model. https://github.com/LieberLieber/LemonTree.Pipeline.Tools
-
ModelCheck Used to check Models for LemonTree Readiness.
-
Remove Pre-Rendered Diagrams If the Enterprise Architect Models are "poluted" with DIAGRAMIMAGEMAPS - you can use this little commandline Tool to delete those! (.eap(x) and .qea(x) only)
-
Additional entry at “Filtering Impacted Elements…” Used to set "Filters" in LemonTree Single Session Files in the Pipeline.